|
||

|
|
||||||||||||||||||
|
#1
 04-02-2011
|
|||
|
|||
|
First credit goes to MR. RED for his original suggestion. As luck would have it i found a allumimum horn that takes the extra work out of the mod. And i wanted more details to share... Check out MR. RED mod here: http://www.oople.com/forums/showthread.php?t=48455
There are other instructions for this mod that take more steps and require a more precise mod with the dremmel in 3 locations. Requires extra hardware and may or may not be as strong as what i am suggesting. As luck would have it i found some parts that make adding a servo saver to the cougar much easier. PARTS NEEDED: -Low Profile servo(KO,Airtronics or Futaba(savox or other) Hitec is not compatible with tamiya servo saver. I have not tested with regular size servo -RC Hi-Torque Servo Saver - Black Item #51000 -Aluminum Horn for Hi-Torque servo saver(M-chassis) #54120 Parts pics:  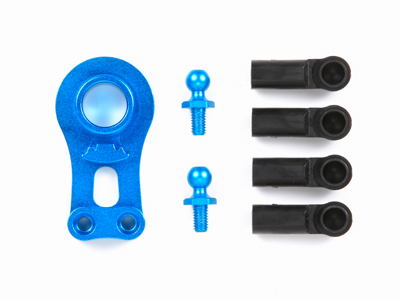 1)mount up servo and center it.(don't finalize your screw tightness you may need to wiggle it up or down for the final fit. 2)Install the plastic servo saver kit but skip the outer plastic parts they are all too short and the is where you install the aluminium horn. 3) Test fit the top deck. IT will more then likely be rubbing the top of the servo saver(the blue aluminum part). Take your sharpie marker and place it at 12noon on the saver and rotate the servo to full throw left and right to mark the outer edge of the saver. For mine i took off about 1mm of material from about 10 o'clock to 3 o'clock. 4) install horn and hook up linkage and test rotate. Make sure the lower link does not drag on the chassis. If it does you may need to wiggle the servo up a bit or grind a bit of ball cup off. If you have room you could try to shim the servo forward. This would raise the link off the chassis but then bring it closer to the top deck. 5)Finished hob will probably expose 2 to 3 of the internal servos springs. None of it will fall apart.  As you can see here the stock horn is long and the ball attaches facing the servo.  Here you can see the tamiya parts hole is just a touch further out by maybe .2mm  Side by side comparison. No lock nuts needed for the ball stud but use lock tight. This shows why a typical servo saver wont work. The key here is you want the face flush and as close to the servo as possible.  Final cuts have been made.  Its important to offset the horn this way. Since the holes are not in the center. Center the horn like this, if you do it the other way the horn hits the bearing on the steering rack  Top down shot showing how tight it is in there. Stock i had about 1mm of clearance with a phat servo and stock horn. Here its less then 1mm with a lowpro and this mod. Hope this helps. 
|
| Thread Tools | |
| Display Modes | |
|
|


 Schumacher


 Threaded Mode