|
||

|
|
||||||||||||||||||
|
|
|
#1
 29-04-2010
|
||||
|
||||
|
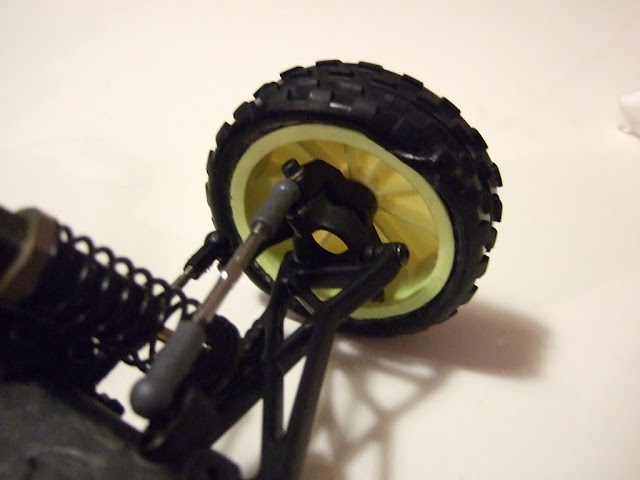
The Atomic Carbon CR2 is an excellent piece of kit but nothing is perfect. Here are some modifications to the car, at this moment solely tested on astroturf (high and medium grip) but each of them being a big improvement on the handling of the CR2.
1) XXX rear end: Those who are familiar with the Losi Forum and/or have ever inspected the car of the Mighty Chris Doughty might have seen this mod already. The rear XXX-CR suspension (pivot block - wishbone - hub) is replaced by parts of the XXX and XXX-T MF2. It looks like this: and The CR pivot block is very wide, which is good for rough tracks. Its predecessor, the BK2, was extremely narrow. And the XXX one is in between. So from narrow to wide: BK2 < XXX < CR. This creates an imbalance front and rear, which can be solved by fitting the XXX block. The following image illustrates this: The block on the right is the standard CR one, as you can see it is a lot wider than the one in the middle (XXX). On the left we have the front Losi pivot block (same on XXX, CR and I think BK2 as well). Notice the same width of the XXX front and XXX rear pivot block => balance. On the first images you can see which hubs I used: XXX-T MF2 ones. You can use the standard CR ones but their bigger offset makes the car a few millimeters wider, which isn't the goal of this mod. The standard XXX or BK2 hubs have the perfect offset, but! have lower camber link mounting holes than the MF2 hubs have. I strongly suggest using the MF2 hubs (middle hole). Part numbers: - Pivot block: LOSA4126 (plastic) or LOSA4149 (aluminium) - Wishbones: LOSA9800 (BK2 graphite) or XXX - Hubs: LOSA2128 Both pivot blocks are good but the plastic ones are prone to excessive play. If you don't want to spend your earnings on an expensive alu one, simply use some spacers, cheap and perfect as well  Wishbones then. If you use the BK2 ones, use the short VLA hole. This has about the same length as the standard hingepin hole of a XXX wishbone. Our findings? The Atomic Carbon team in Belgium tested it during a club race and National @ Kampenhout, and found this rear end to be a big improvement. It gives the car more steering while maintaining a lot of rear end grip. The car's suspension reacts in a more balanced way as well. So far we haven't noticed any downsides to this mod. 2) Front wheelbase mod: This is a very simple one. The idea is to extend the wheelbase of the car on its front end. So dremel about 1,5mm off the front side of the hub (1,5mm is about the thickness of a wheelbase spacer at the back) and move the hubs forward. This will increase the total wheelbase, but that isn't the only goal. When placing your front and rear hubs forward (so front long and rear medium wheelbase) you don't make the car any longer, but maintain the wheelbase. The only difference is that more weight is shifted to the rear end of the car. Simply moving the rear hub forward does the same thing, but the CR2 is already a short car, so with this mod you don't make it any shorter and you'll still be able to get more weight to the back. Here is an example: The effect? I used both front and rear long wheelbase, this made the car a lot more stable. It gives you a little less steering, but most people will hardly notice it. And while not being really faster over a single lap, it does make it a lot easier to be fast on a consistent base. Again we are all using it (with great effect, the CR2s had 1st, 5th and 7th place at the National) as it makes the car a lot easier and more fun to drive. 3) Battery bar - 'the Northy strap' This is a picture of Jonathan's car (I hope he doesn't mind ):As you can see it has only 1 battery bar, which makes it a lot easier to change batteries. You can make it yourself out of a B4 battery brace but JC will make them himself as well, and they look brilliant! Secondly, the link going from the top of the gearbox to the battery brace is an anti-flex link. This way you don't need the brass gearbox brace anymore. Only difference is that we made a small plate on top of the gearbox with a hole in the middle, to have the link more in the center line of the car instead of having to choose one of the (non-centered) holes. 4) Extra hole in rear wishbone: We did it on the S2, and we did it on the CR2: drilling an extra inner hole in the rear wishbones. Both on the CR and XXX rear end this helps rotate the car faster and enables a bigger or faster throttle input when riding bumps. In fact on the XXX rear end the extra inner hole is the standard one at the moment. From center of standard inner hole to center of newly drilled hole it should be around 4-5mm. Note that you should adjust your dampening to this new position. I'm using 2,5wt-5wt thicker oil and a smaller piston with the new hole. I hope this helps

|
|
#3
29-04-2010
|
||||
|
||||
|
How did you mount the rear end? The bottom of the chassis rubs the arms if you put on the aluminum pivot block and a9800 arms, and there isn't much material to remove either... I use this mod on my regular CR, and it works great, but I'd like to try it on the CR2 as well.
__________________
Martin Sørlie, 1985. Spektrum DX4R Pro - TLR 22 2.0 & TLR 22-4 - Absima Team Smallsize
|
|
#4
29-04-2010
|
||||
|
||||
|
Take a bit of material off with a dremel or file, you don't have to remove that much as it is quite close.
And of course you will have to do this with the T-plate as well, as the hingepins are closer to each other on the XXX block.
|
|
#5
29-04-2010
|
||||
|
||||
|
Quote:
 I'm nearly always faster with my CR than with my CR2, so I need to try it all 
__________________
Martin Sørlie, 1985. Spektrum DX4R Pro - TLR 22 2.0 & TLR 22-4 - Absima Team Smallsize
|
|
#7
26-11-2010
|
||||
|
||||
|
:
Does anyone make this battery bar/ posts, or am i going to have to make it in my shed
__________________
|
|
#8
26-11-2010
|
||||
|
||||
|
Jonathan of Atomic Carbon makes these, just send him a pm (OldTimer on this forum).
You then have 2 choices: mount two links on the holes drilled in the battery bar, or drill an extra hole in between the pre-drilled holes and use 1 link. I did the latter.
|
|
#9
14-12-2010
|
|||
|
|||
|
Quote:
 This is a XX4 wishbone flipped with XX4 upright and hub. You gain about 8mm in wheelbase. You have to ad a shock spacer and small shim to fit the wishbone to the XXX pivot - as below. I used a cut down rear hinge pin, but you could use a shock shaft or suitable hinge pin from another car.  I've been using this setup on a tight high grip carpet track with the uprights reversed - giving 10 degrees of castor. You can drive it like a 4wd! All of the pics of the car and more of the mod are here: http://picasaweb.google.com/irishwil...hiteWinter2010# Can anyone who tries it let us all know what you think?
__________________
www.facebook.com/racewayone RACEWAYONE :: LMR :: MIBOSPORT :: RC CONCEPT :: SMD Trader Feedback: http://oople.com/forums/showthread.php?t=81070
|
|
#10
14-12-2010
|
||||
|
||||
|
I saw the car run with this mod and it was awesome!
__________________
Team Schumacher www.racing-cars.com Paint by www.customblitz.co.uk Feedback http://www.oople.com/forums/showthread.php?t=67178 
|
|
#12
14-12-2010
|
||||
|
||||
|
Quote:
__________________
Team Schumacher www.racing-cars.com Paint by www.customblitz.co.uk Feedback http://www.oople.com/forums/showthread.php?t=67178
|
|
#13
15-12-2010
|
|||
|
|||
|
Quote:
__________________
www.facebook.com/racewayone RACEWAYONE :: LMR :: MIBOSPORT :: RC CONCEPT :: SMD Trader Feedback: http://oople.com/forums/showthread.php?t=81070
|
|
#14
23-01-2011
|
||||
|
||||
|
Quote:
|
|
#15
23-01-2011
|
||||
|
||||
|
I don't have my CR2 anymore, so can't measure it. But it depends on the height of your battery pack: a higher pack will need a shorter link and vice versa.
But it is a camber link, so not too hard to adjust I think I used a Losi front camber link, with 1 normal ball cup and 1 8ight steering ball cup. Use as much of the 8ight cups on your car as possible, they are perfect!
|
 |
| Thread Tools | |
| Display Modes | |
|
|


 Atomic Carbon


 Hybrid Mode
